> ## Documentation Index
> Fetch the complete documentation index at: https://wiki.hoa.moe/llms.txt
> Use this file to discover all available pages before exploring further.
# 资料上传
> 单文件夹与多文件夹资料上传流程
## 单文件夹上传文件
GitHub 提供的方法实际上支持多文件上传,但这些文件必须上传到 **同一个目标文件夹**,因此称为「单文件夹上传」。
使用场景如:上传某课程试卷和或其答案,同属 exams 文件夹。
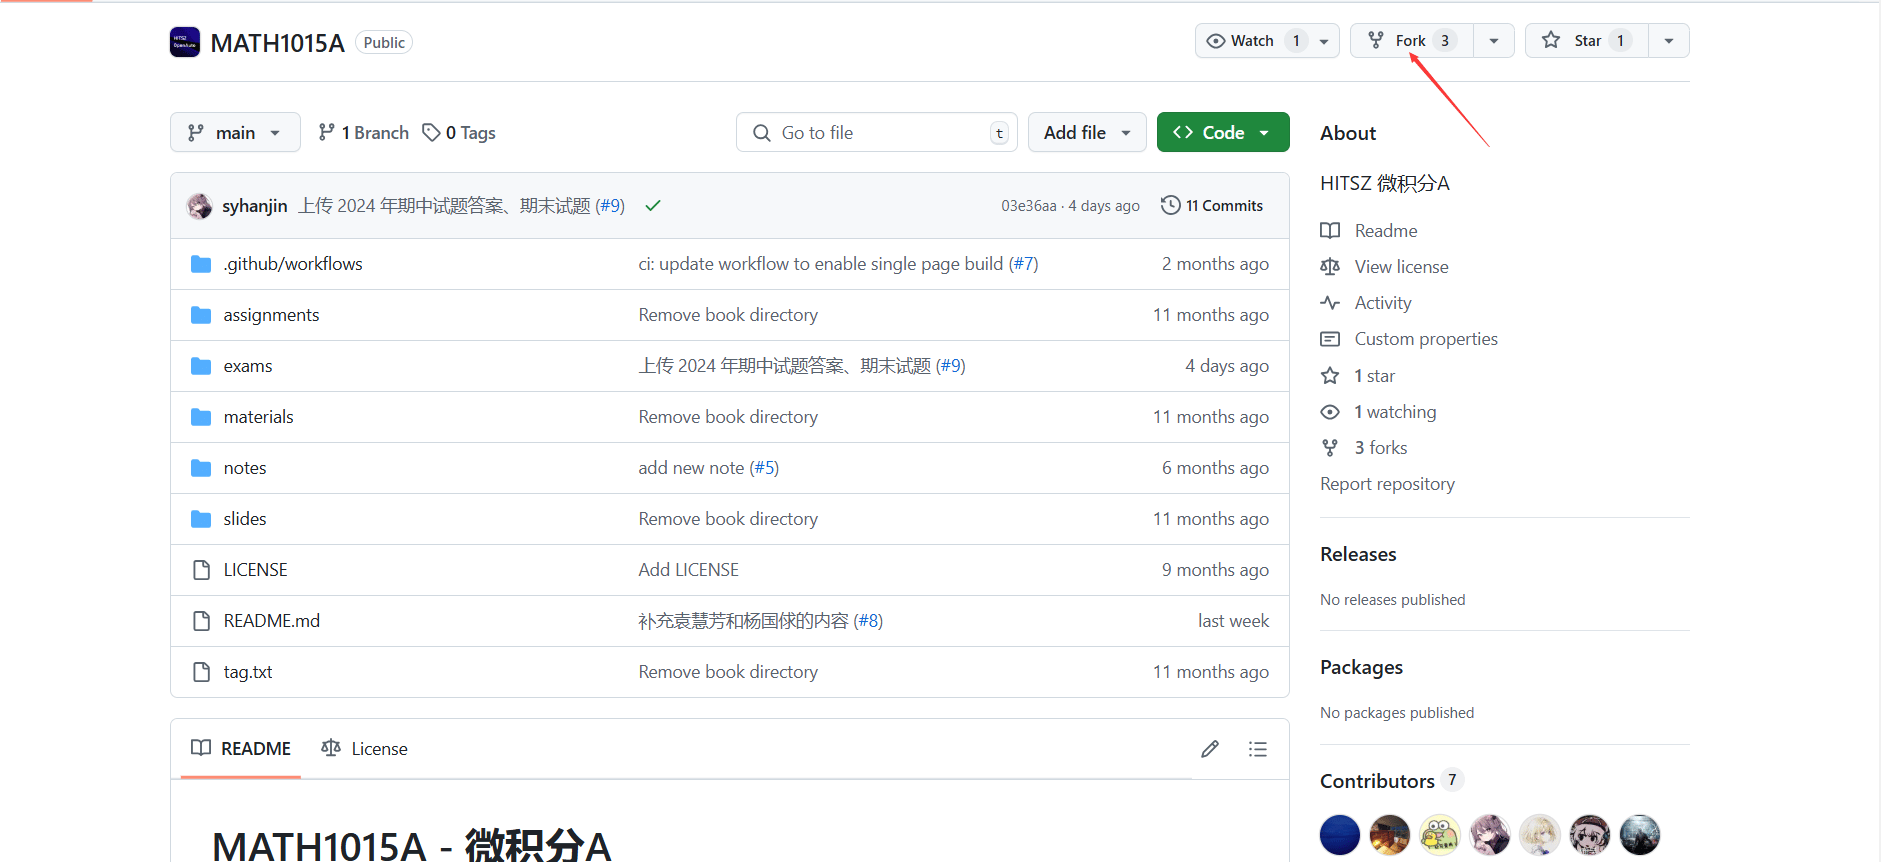
### 手动 Fork 仓库
由于我们的仓库设置了文件上传保护,需要手动创建自己的仓库分支。
 ### 在自己的仓库上传文件
仓库里的文件夹一般有四个,请对应上传:
* assignments 作业
* exams 考试
* notes 个人笔记
* slides 来自教师的资料
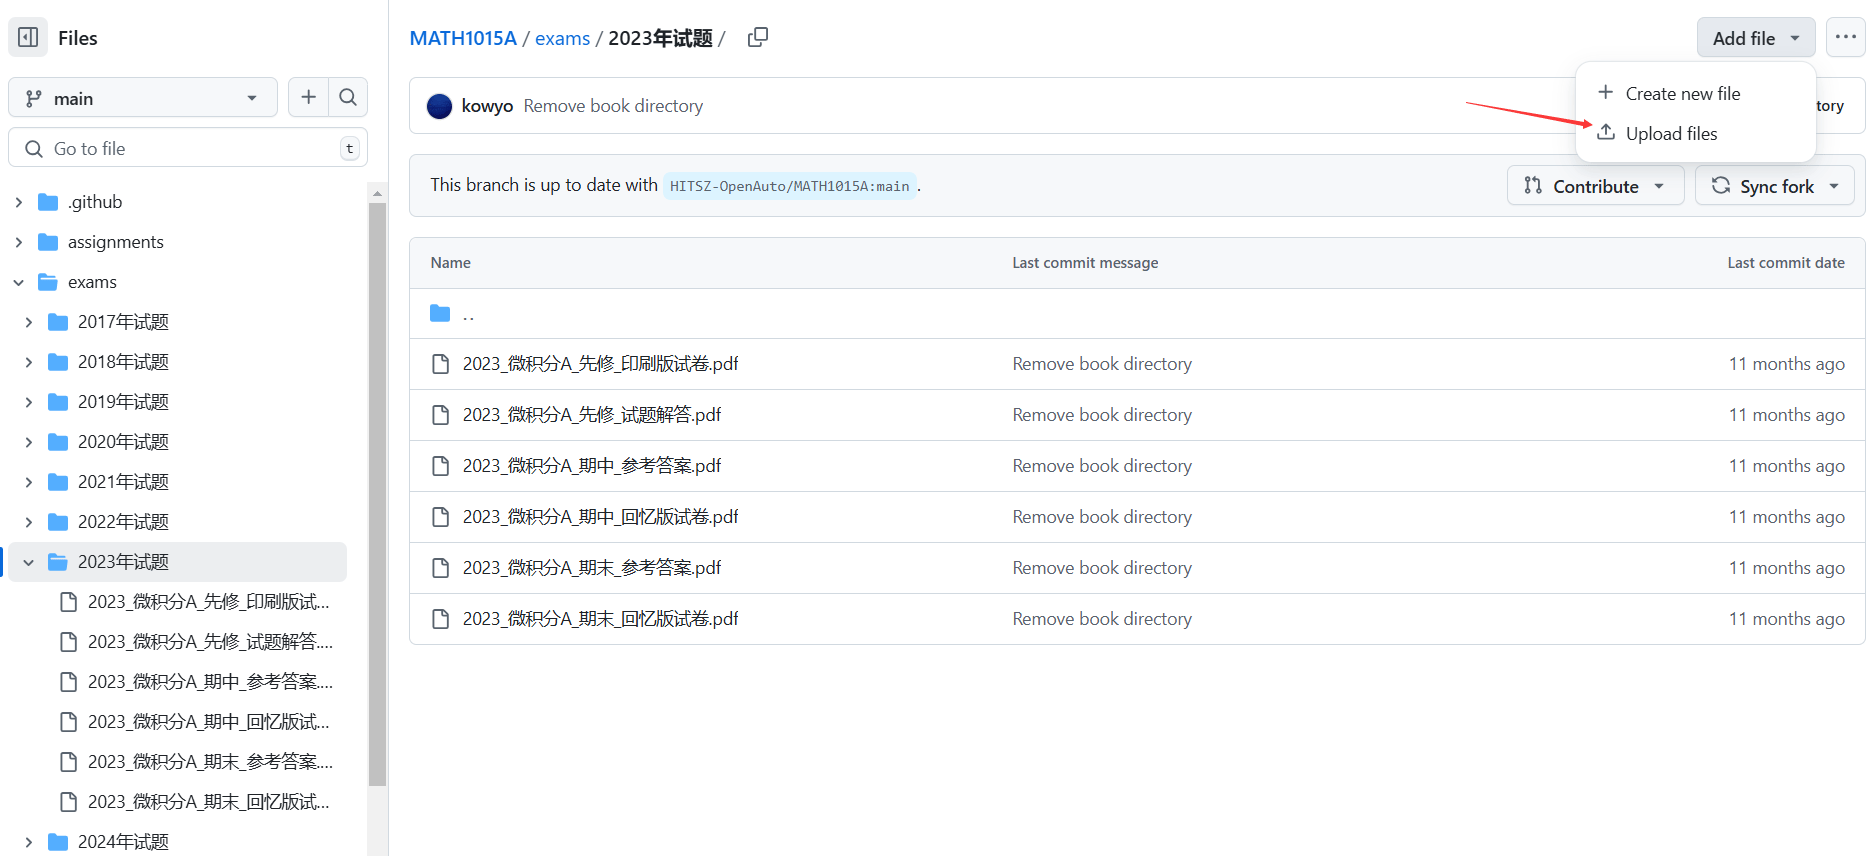
在自己的仓库总页面,点击你想上传的文件夹,然后点如图按钮;在上传界面拖拽文件即可。这一步支持多文件上传。
### 在自己的仓库上传文件
仓库里的文件夹一般有四个,请对应上传:
* assignments 作业
* exams 考试
* notes 个人笔记
* slides 来自教师的资料
在自己的仓库总页面,点击你想上传的文件夹,然后点如图按钮;在上传界面拖拽文件即可。这一步支持多文件上传。
 > 如果你是使用 codespace 进行编辑的,千万要记得保存。我写了半个小时的课程评价误触退出之后全没了。
> 文 / [Cecilia](https://github.com/mircecilia), 2025.1
### 发起 Pull Request
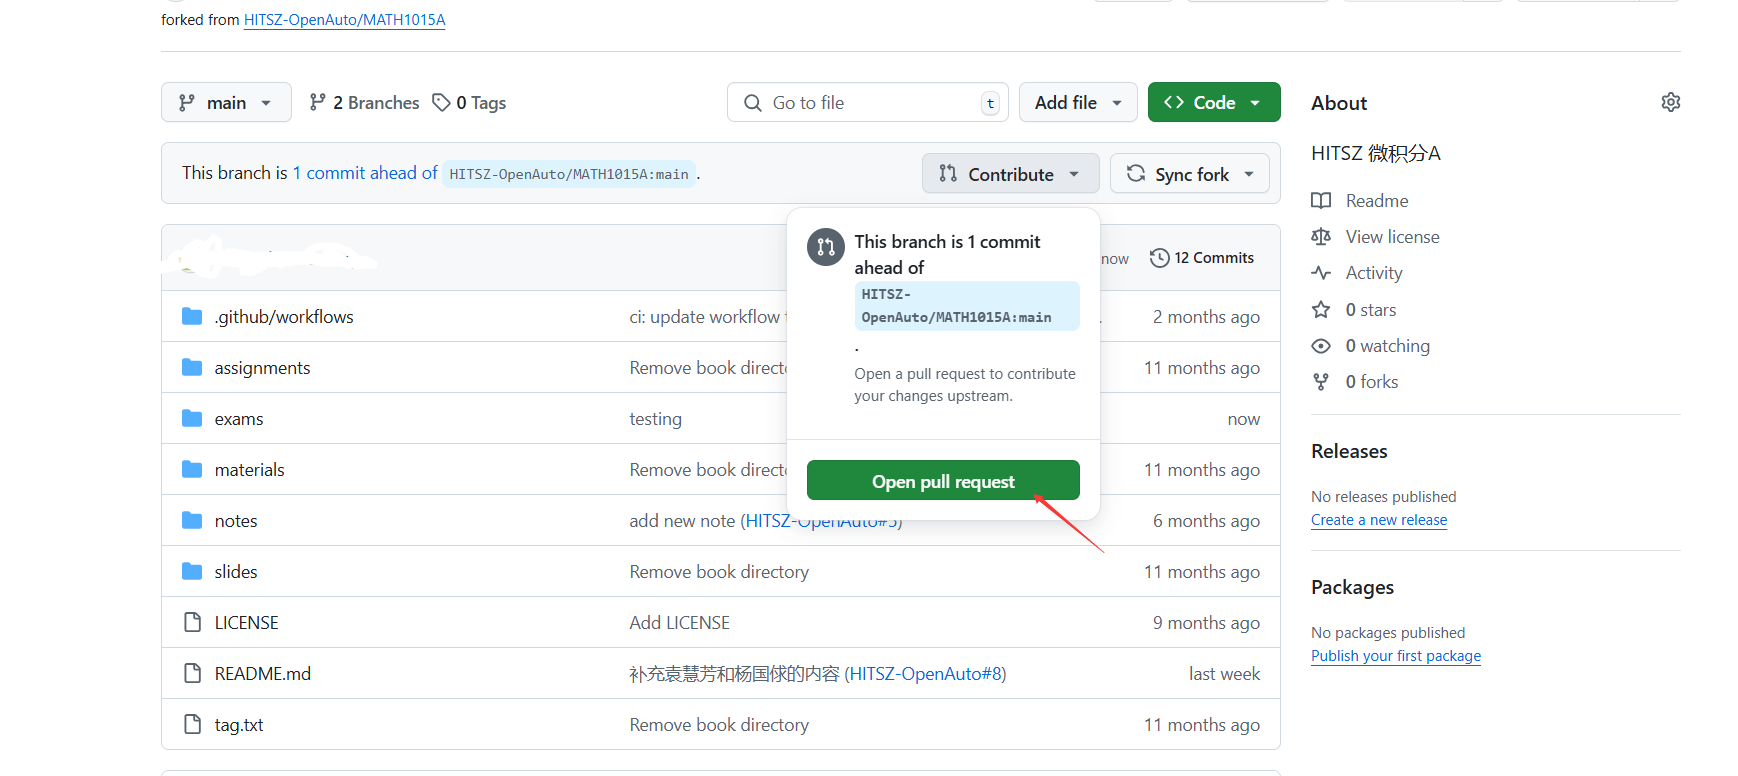
再次回到自己的仓库,主界面会发现显眼的标注。
> 如果你是使用 codespace 进行编辑的,千万要记得保存。我写了半个小时的课程评价误触退出之后全没了。
> 文 / [Cecilia](https://github.com/mircecilia), 2025.1
### 发起 Pull Request
再次回到自己的仓库,主界面会发现显眼的标注。
 然后就是和 [上文](#发起-pull-request) 一样的流程。
## 多文件夹上传文件
### Git 本地编辑
#### git clone
首先将仓库 Fork 到自己名下。
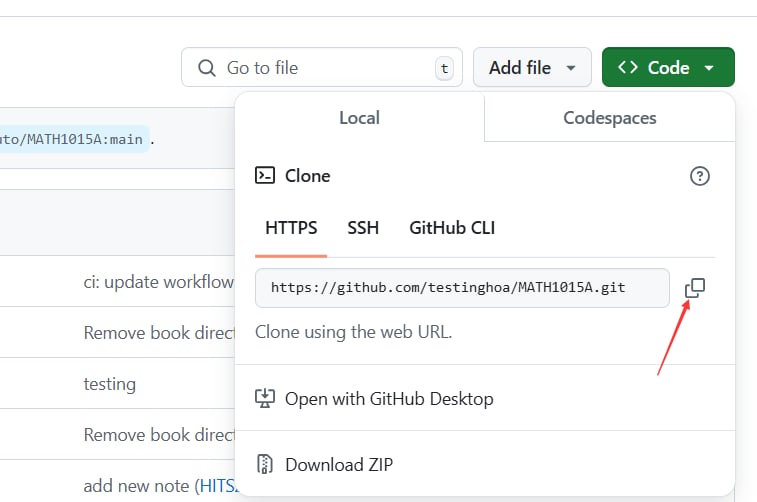
然后进入自己的仓库,找到仓库链接并复制下来。
然后就是和 [上文](#发起-pull-request) 一样的流程。
## 多文件夹上传文件
### Git 本地编辑
#### git clone
首先将仓库 Fork 到自己名下。
然后进入自己的仓库,找到仓库链接并复制下来。
 打开一个文件夹,在命令行运行:
`git clone <你刚刚复制的仓库链接>`
这样,**仓库就已经成为你的 `本地文件`**。在本地,你就可以随心所欲地进行各种修改,包括文档修改和文件上传。
> `本地文件` 指的是你存在自己电脑上、想要提交到我们的仓库里的文件。
#### commit & push
确认所有修改都完成后,我们就可以把 `本地文件` 推送到 `远程仓库` 了。这时候,`远程仓库` 还是你自己的,而非 HOA 的。(从自己的 `远程仓库` 通过 Pull Request 才能把内容推送到 HOA 的 `远程仓库`)
在命令行中,逐行执行以下命令:
```bash theme={null}
git add . # 将当前目录下所有修改部分提交至暂存区
git commit -m "commit message" # 提交更改,message 需要遵守公约
git push # 将本地修改同步到远端仓库
```
如果在 push 时遇到以 "fatal: unable to access" 开头的错误,例如:
```bash theme={null}
fatal: unable to access 'https://github.com//AUTO3005.git/': OpenSSL SSL_connect: SSL_ERROR_SYSCALL in connection to github.com:443
```
可能是因为你的网络环境无法访问 GitHub,可以尝试使用 VPN,或者参考 [《新人指南:不使用第三方工具访问 GitHub》](https://hoa.moe/blog/access-github/#3-通过修改-hosts-文件访问-github) 中修改 Host 文件的方法。
#### 发起 Pull Request
参考 [课程文档页面](/contribution-guide/course-docs#发起-pull-request) 即可。
### (选修)Codespaces
本方法对体积较大仓库尤为适用。
#### Fork & Create
第一步仍然是 Fork 仓库到自己名下,如前文所述。
然后在 **你的仓库** 里如图新建 Codespaces,等待页面跳转和加载。可能要等一段时间。
打开一个文件夹,在命令行运行:
`git clone <你刚刚复制的仓库链接>`
这样,**仓库就已经成为你的 `本地文件`**。在本地,你就可以随心所欲地进行各种修改,包括文档修改和文件上传。
> `本地文件` 指的是你存在自己电脑上、想要提交到我们的仓库里的文件。
#### commit & push
确认所有修改都完成后,我们就可以把 `本地文件` 推送到 `远程仓库` 了。这时候,`远程仓库` 还是你自己的,而非 HOA 的。(从自己的 `远程仓库` 通过 Pull Request 才能把内容推送到 HOA 的 `远程仓库`)
在命令行中,逐行执行以下命令:
```bash theme={null}
git add . # 将当前目录下所有修改部分提交至暂存区
git commit -m "commit message" # 提交更改,message 需要遵守公约
git push # 将本地修改同步到远端仓库
```
如果在 push 时遇到以 "fatal: unable to access" 开头的错误,例如:
```bash theme={null}
fatal: unable to access 'https://github.com//AUTO3005.git/': OpenSSL SSL_connect: SSL_ERROR_SYSCALL in connection to github.com:443
```
可能是因为你的网络环境无法访问 GitHub,可以尝试使用 VPN,或者参考 [《新人指南:不使用第三方工具访问 GitHub》](https://hoa.moe/blog/access-github/#3-通过修改-hosts-文件访问-github) 中修改 Host 文件的方法。
#### 发起 Pull Request
参考 [课程文档页面](/contribution-guide/course-docs#发起-pull-request) 即可。
### (选修)Codespaces
本方法对体积较大仓库尤为适用。
#### Fork & Create
第一步仍然是 Fork 仓库到自己名下,如前文所述。
然后在 **你的仓库** 里如图新建 Codespaces,等待页面跳转和加载。可能要等一段时间。
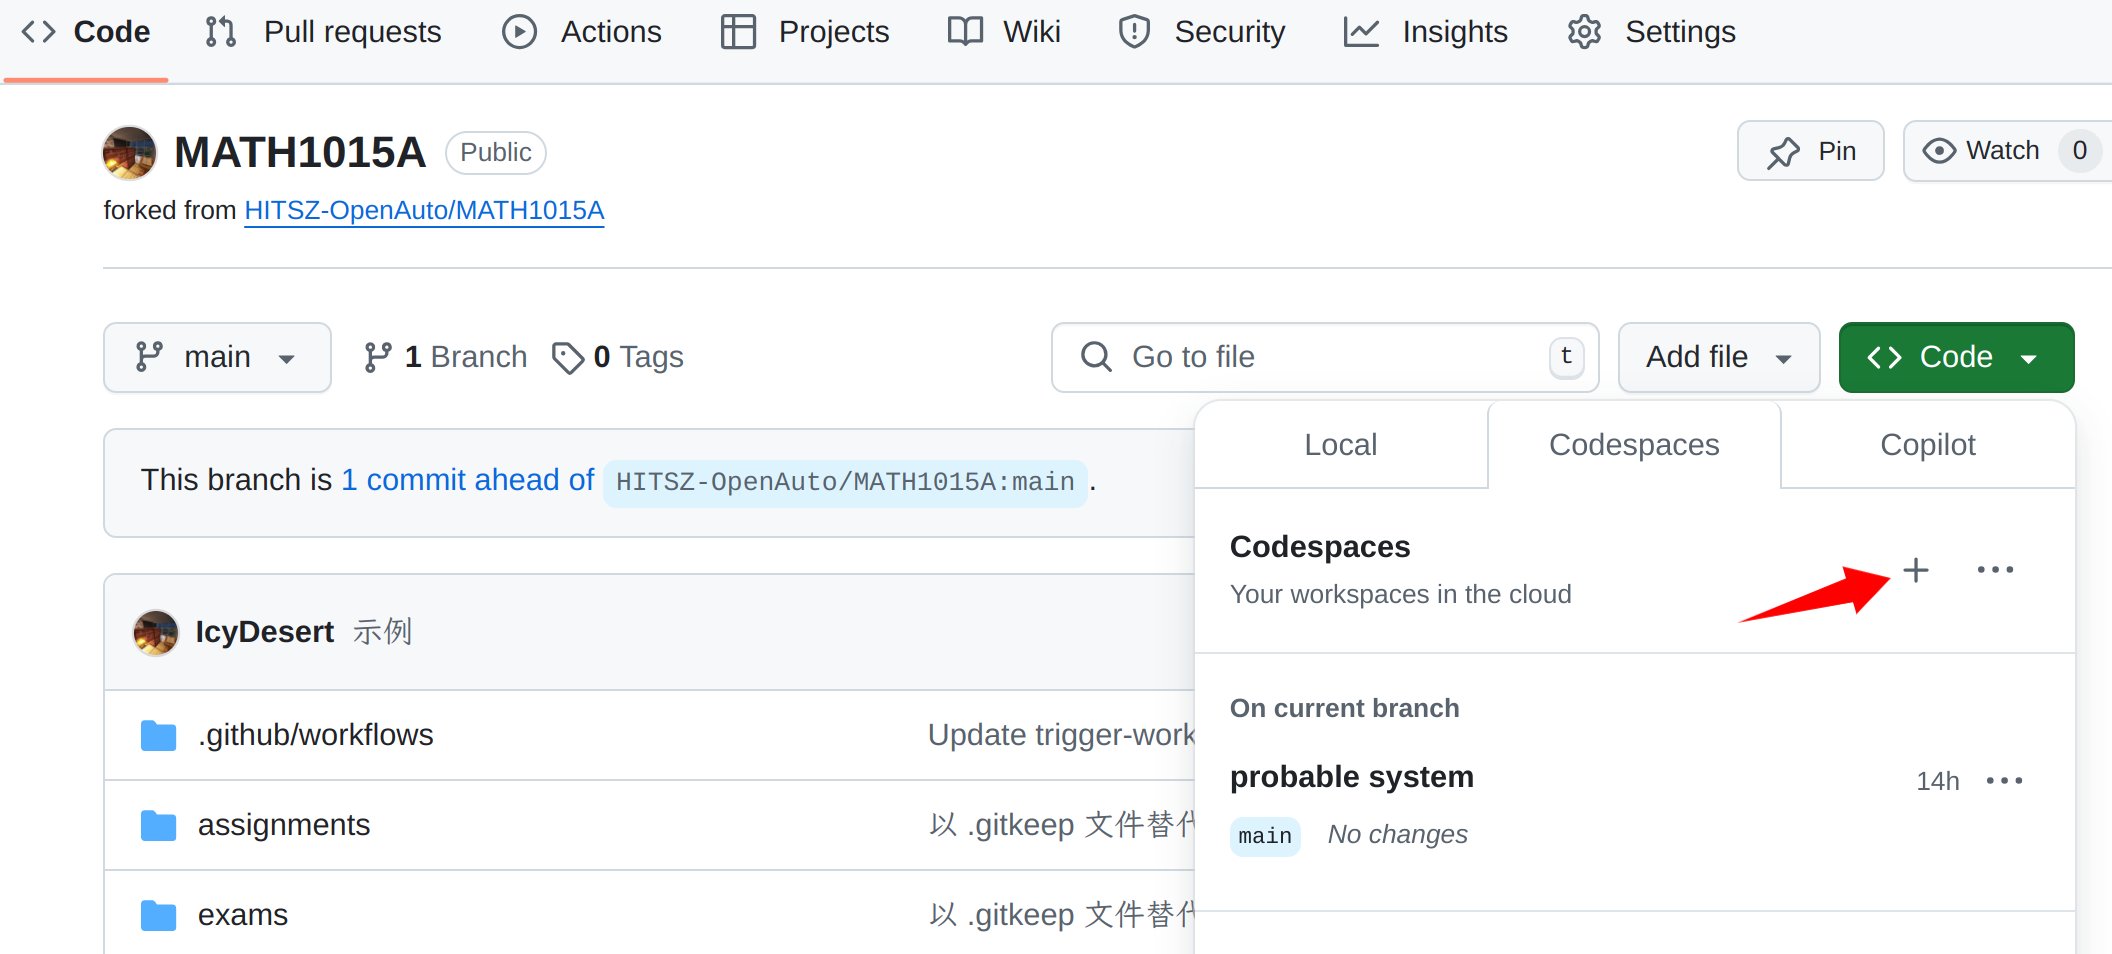 *这一步是 Codespaces 应对超大文件的方法。等待的时间里,GitHub 将创建云端虚拟机并把文件通过网络发送上去,如此,文件便成为云端(服务器)的本地文件,从而规避了本地磁盘的 Git LFS 问题。你可以理解为文件放在网盘上。*
### 开始修改
跳转完成后你将看到如下界面:
*这一步是 Codespaces 应对超大文件的方法。等待的时间里,GitHub 将创建云端虚拟机并把文件通过网络发送上去,如此,文件便成为云端(服务器)的本地文件,从而规避了本地磁盘的 Git LFS 问题。你可以理解为文件放在网盘上。*
### 开始修改
跳转完成后你将看到如下界面:
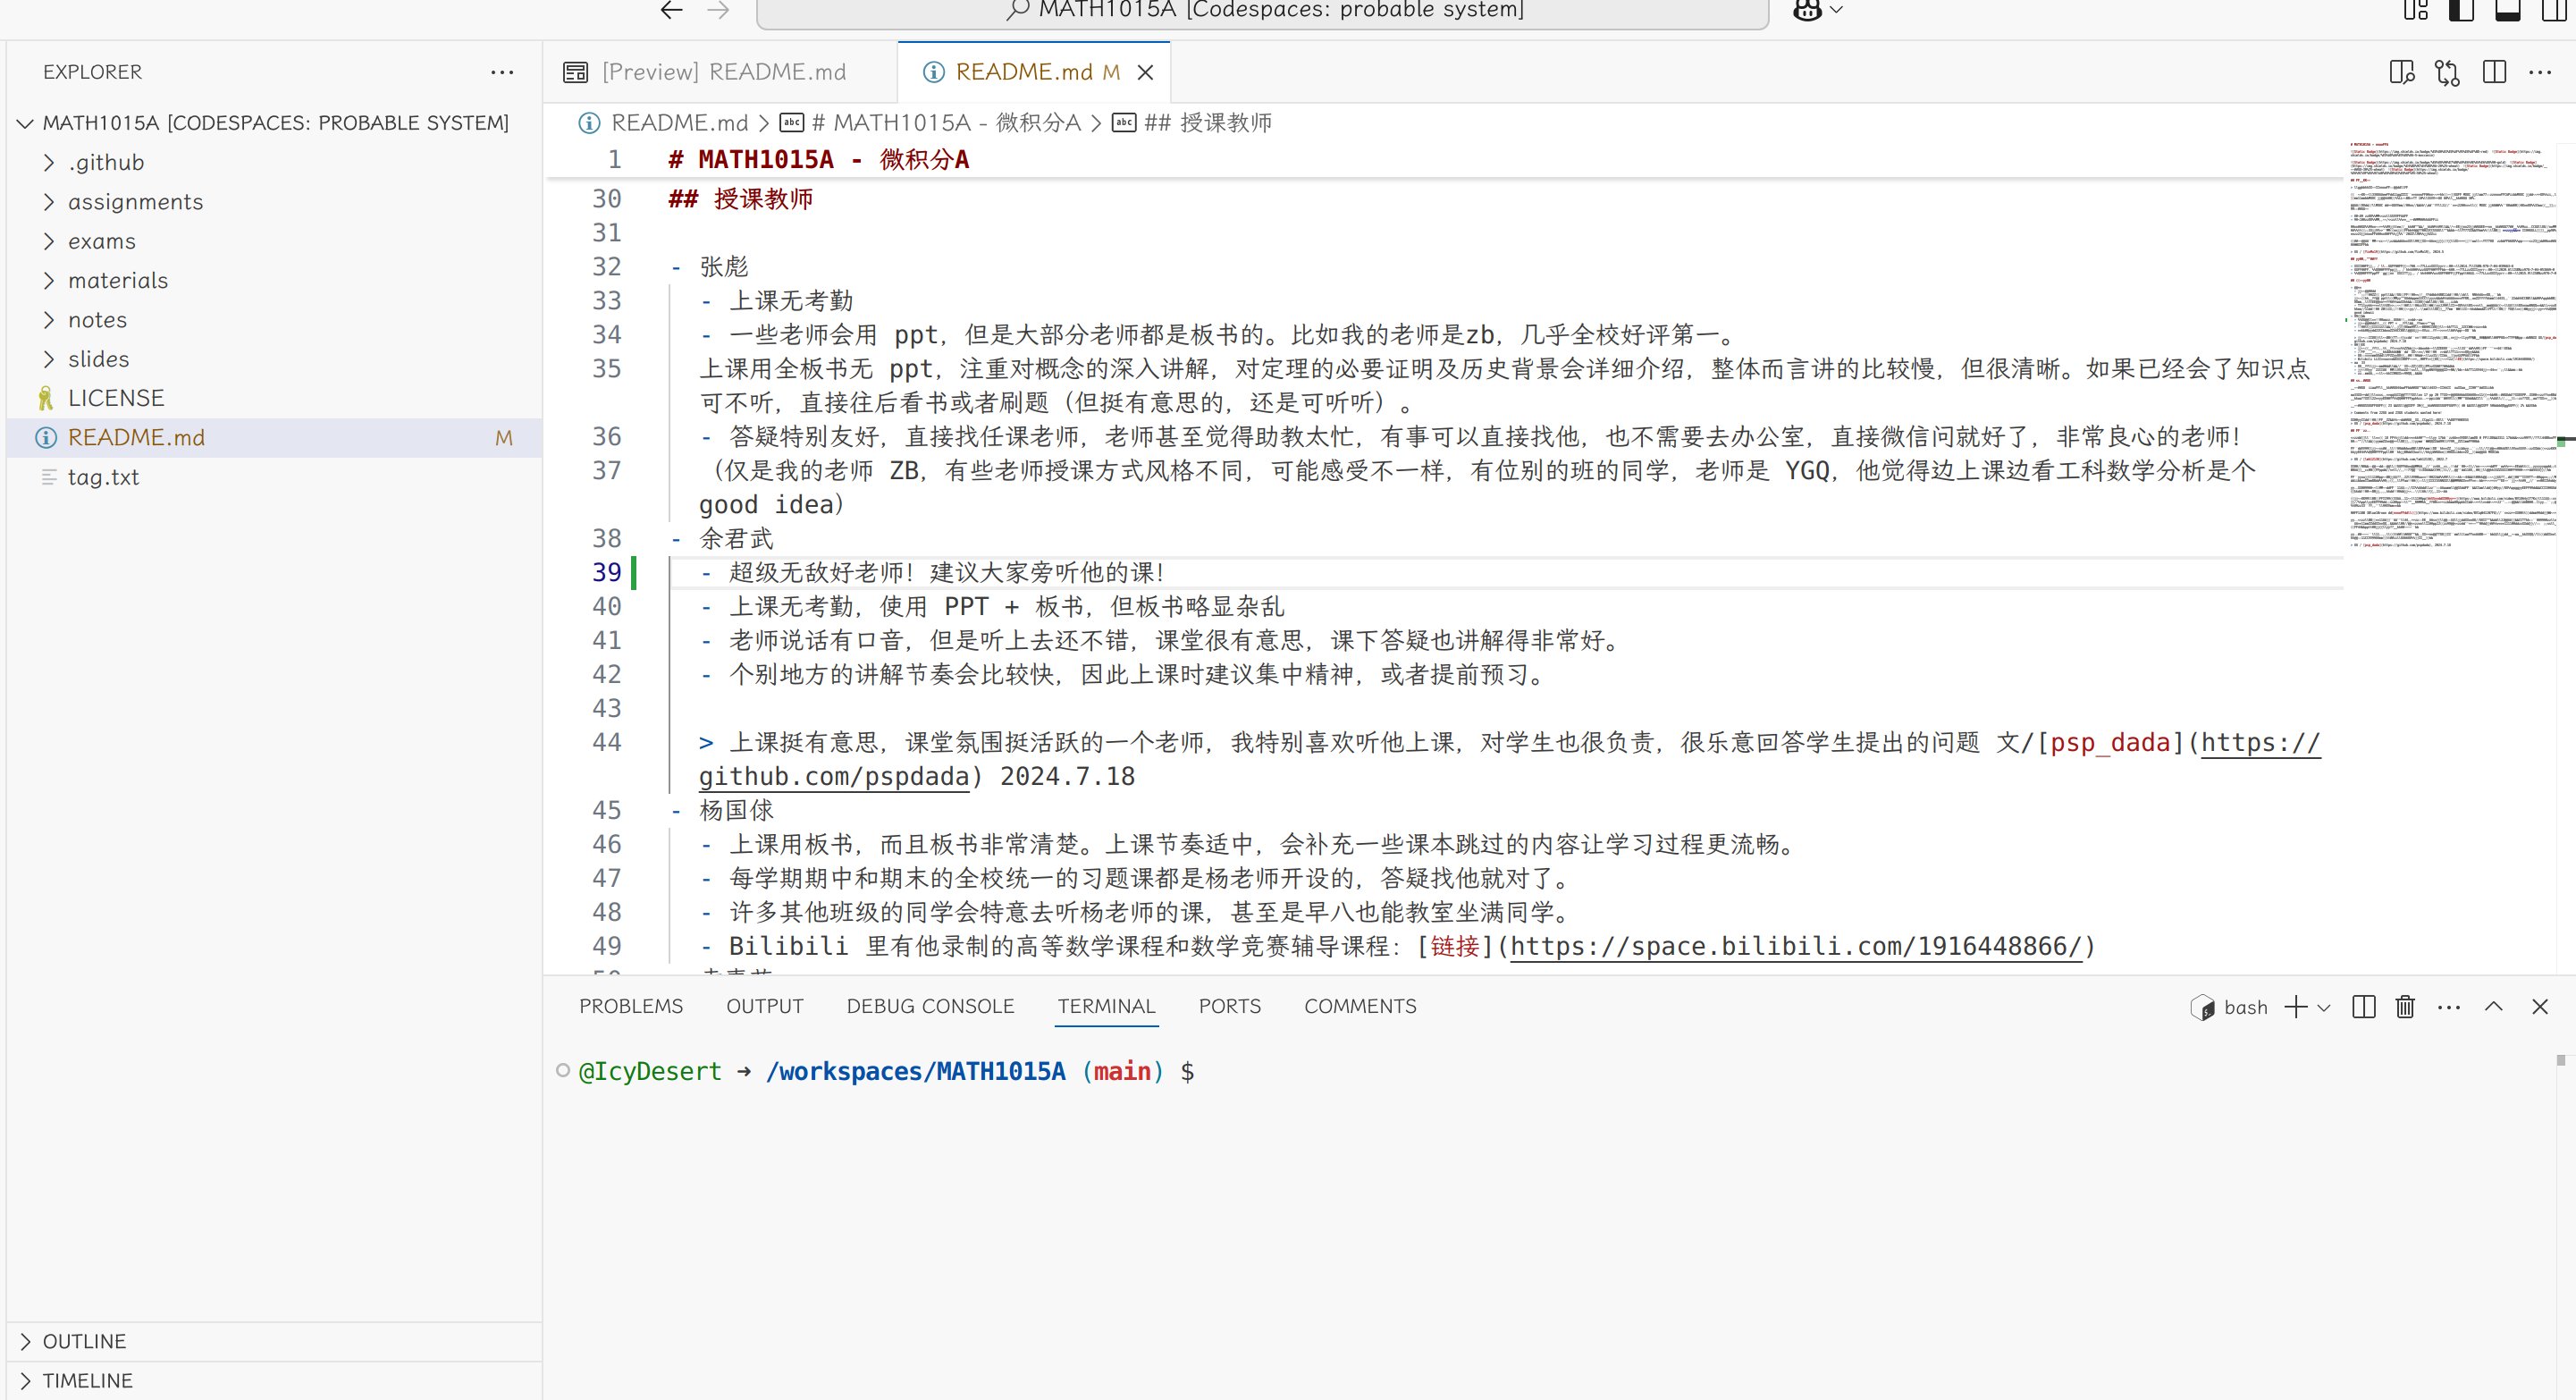 若你使用过 Visual Studio Code,那么你可以无缝融入 Codespaces 工作流中,书写你独创的内容。
若你未使用过,别担心,我们会详细讲解操作。
* 左侧边栏是文件管理器,可以浏览文件或文件夹(后者带 `>`)。点击文件可以浏览内容,拖拽 `本地文件` 到对应文件夹实现指定路径上传。
* 右侧上部大块的白色区域是浏览和编辑区。
* 右侧下部小块的灰色区域是命令行,接下来我们会在这里执行 Git 指令。
在编辑区编辑文件,在文件管理器上传 `本地文件`。
#### commit & push
确认所有想要修改的地方都已完成后,单击命令行区域,逐行执行以下命令:
```bash theme={null}
git add . # 将当前目录下所有修改部分提交至暂存区
git commit -m "commit message" # 提交更改,message 需要遵守公约
git push # 将本地修改同步到远端仓库
```
#### 发起 Pull Request
参考 [课程文档页面](/contribution-guide/course-docs#发起-pull-request) 即可。
### (选修)在本地直接编辑远程仓库
本方法对体积较大仓库尤为适用。
为解决 `git clone` 因仓库体积过大而失败的问题,前面已经介绍了一种使用 Codespaces 的方法。除此之外,[潜伏](https://github.com/capoo-fan) 还发现一种依赖一个插件、直接在 Visual Studio Code 上编辑的方法。使用此方法打开 `hoa-moe` 仓库仅需几秒(魔法状态下);无需 `本地文件` 即可编辑仓库,并可直接将修改 push 到远程仓库,非常方便。
#### Fork
将仓库 fork 到自己的 GitHub 账号下,如前文所述。
#### 插件安装及登录
下载并安装 [GitHub Repositories](https://marketplace.visualstudio.com/items?itemName=GitHub.remotehub) 插件。当然,你也可以在 VS Code 的插件市场搜索。
若你使用过 Visual Studio Code,那么你可以无缝融入 Codespaces 工作流中,书写你独创的内容。
若你未使用过,别担心,我们会详细讲解操作。
* 左侧边栏是文件管理器,可以浏览文件或文件夹(后者带 `>`)。点击文件可以浏览内容,拖拽 `本地文件` 到对应文件夹实现指定路径上传。
* 右侧上部大块的白色区域是浏览和编辑区。
* 右侧下部小块的灰色区域是命令行,接下来我们会在这里执行 Git 指令。
在编辑区编辑文件,在文件管理器上传 `本地文件`。
#### commit & push
确认所有想要修改的地方都已完成后,单击命令行区域,逐行执行以下命令:
```bash theme={null}
git add . # 将当前目录下所有修改部分提交至暂存区
git commit -m "commit message" # 提交更改,message 需要遵守公约
git push # 将本地修改同步到远端仓库
```
#### 发起 Pull Request
参考 [课程文档页面](/contribution-guide/course-docs#发起-pull-request) 即可。
### (选修)在本地直接编辑远程仓库
本方法对体积较大仓库尤为适用。
为解决 `git clone` 因仓库体积过大而失败的问题,前面已经介绍了一种使用 Codespaces 的方法。除此之外,[潜伏](https://github.com/capoo-fan) 还发现一种依赖一个插件、直接在 Visual Studio Code 上编辑的方法。使用此方法打开 `hoa-moe` 仓库仅需几秒(魔法状态下);无需 `本地文件` 即可编辑仓库,并可直接将修改 push 到远程仓库,非常方便。
#### Fork
将仓库 fork 到自己的 GitHub 账号下,如前文所述。
#### 插件安装及登录
下载并安装 [GitHub Repositories](https://marketplace.visualstudio.com/items?itemName=GitHub.remotehub) 插件。当然,你也可以在 VS Code 的插件市场搜索。
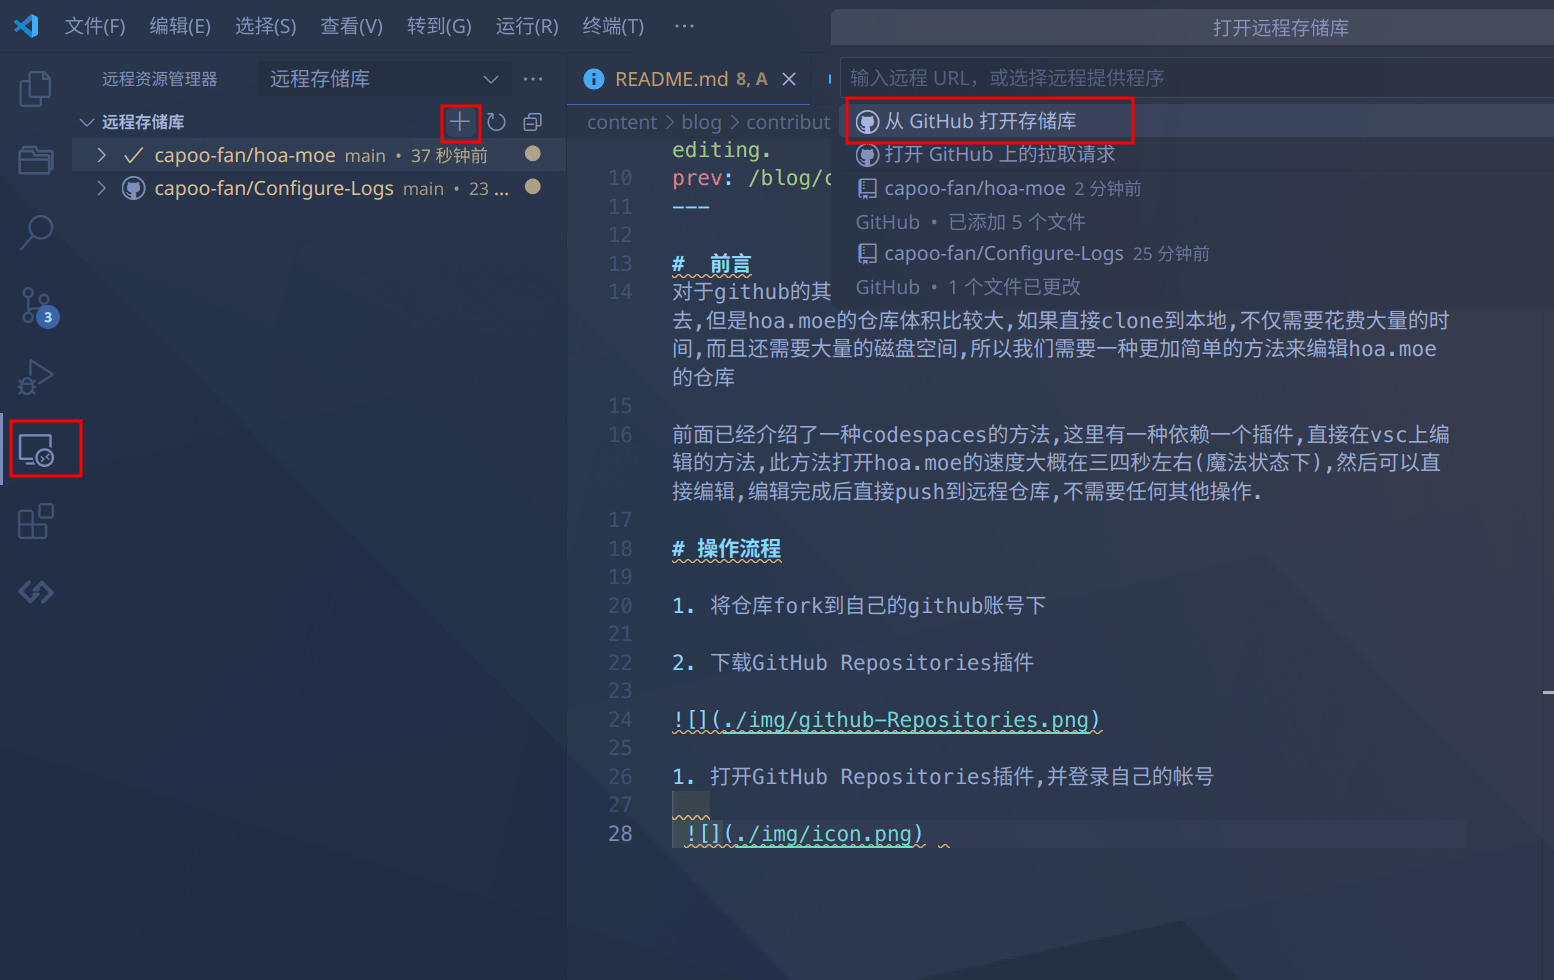
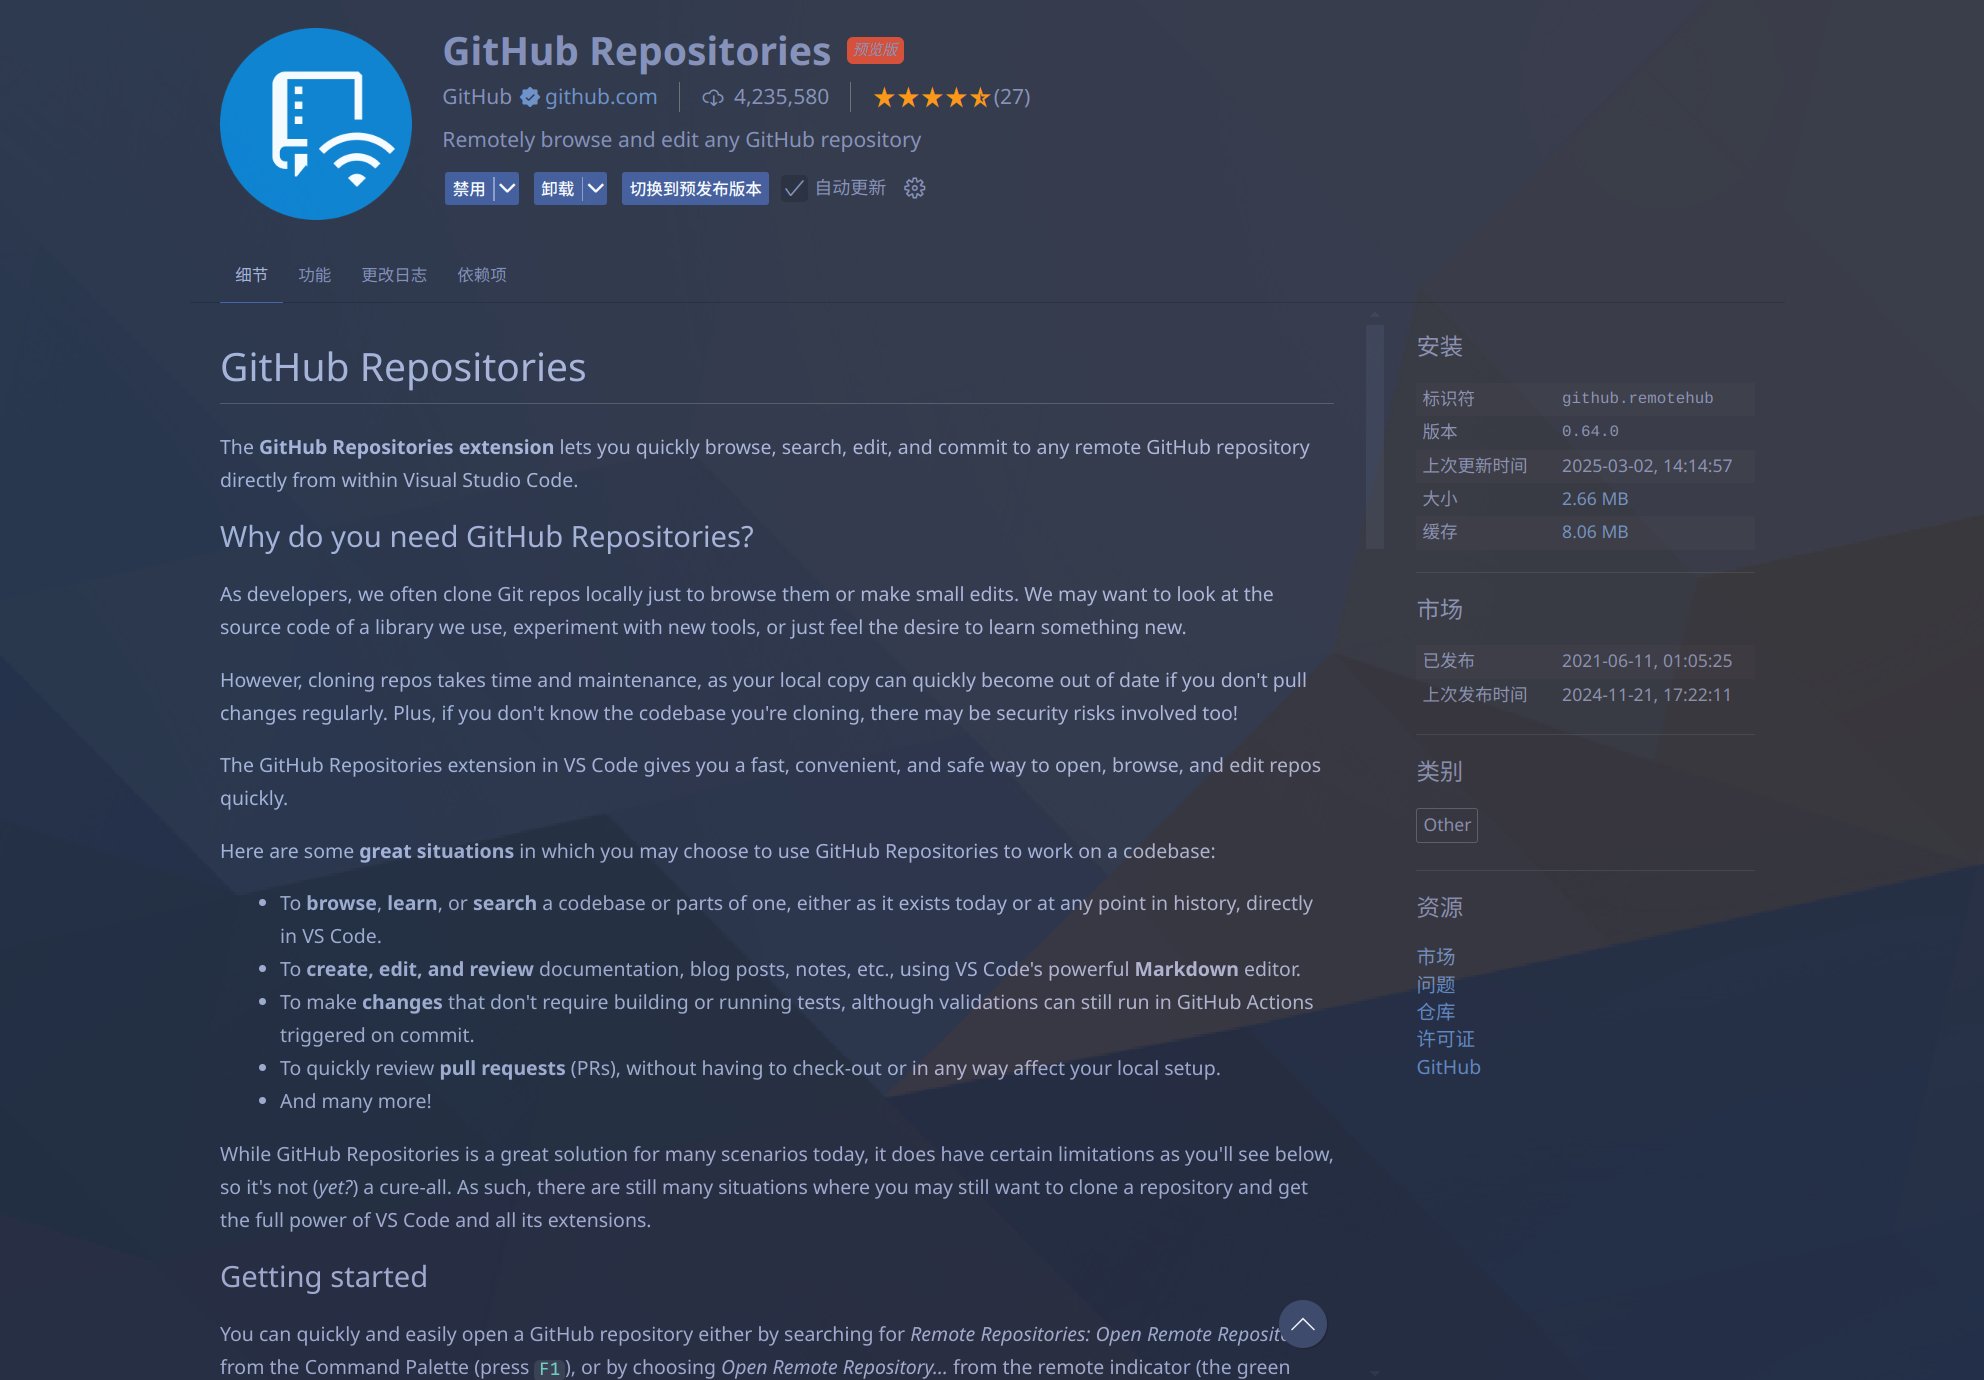 打开 [GitHub Repositories](https://marketplace.visualstudio.com/items?itemName=GitHub.remotehub) 插件,并登录自己的 GitHub 账号,打开对应仓库。
 #### 修改文件
虽然 [Markdown-Preview-Enhanced](https://marketplace.visualstudio.com/items?itemName=shd101wyy.markdown-preview-enhanced) 插件在远程仓库中无法使用,但是此时只需要 `Ctrl+Shift+V` 打开 VS Code 内置的 Markdown 预览即可,所以不需要担心没法预览的问题。不过要再次提醒,其 Markdown 预览渲染和 hoa.moe 使用的 Hugo 渲染效果不同,仅供参考。
#### push & PR
编辑完成后,就可以直接在 VS Code 上将修改 push 到远端仓库,最后回到 GitHub 远端仓库的网页下提交 PR 了。
这个方法是笔者在读 [VS Code 官方文档](https://code.visualstudio.com/docs) 时发现的方法,很简便且易于操作,在这里分享给大家。同时也推荐大家多读官方文档或者 GitHub 原作者的 README,往往会有意想不到的收获。
提交修改前,请遵守 [公约](/contribution-guide#公约)。
This documentation is built and hosted on [Mintlify](https://mintlify.com), a developer documentation platform.
#### 修改文件
虽然 [Markdown-Preview-Enhanced](https://marketplace.visualstudio.com/items?itemName=shd101wyy.markdown-preview-enhanced) 插件在远程仓库中无法使用,但是此时只需要 `Ctrl+Shift+V` 打开 VS Code 内置的 Markdown 预览即可,所以不需要担心没法预览的问题。不过要再次提醒,其 Markdown 预览渲染和 hoa.moe 使用的 Hugo 渲染效果不同,仅供参考。
#### push & PR
编辑完成后,就可以直接在 VS Code 上将修改 push 到远端仓库,最后回到 GitHub 远端仓库的网页下提交 PR 了。
这个方法是笔者在读 [VS Code 官方文档](https://code.visualstudio.com/docs) 时发现的方法,很简便且易于操作,在这里分享给大家。同时也推荐大家多读官方文档或者 GitHub 原作者的 README,往往会有意想不到的收获。
提交修改前,请遵守 [公约](/contribution-guide#公约)。
This documentation is built and hosted on [Mintlify](https://mintlify.com), a developer documentation platform.